This is a companion to my canvas stretching post.
After you stretch a perfectly taut and square canvas, you’re ready to prepare the surface.
Our goal is threefold:
- protect the canvas
- protect the paint
- create a perfect surface
Why do we have to protect the canvas? Oil is acidic, so if you paint directly on the canvas, the oil will burn/rot the canvas as it dries. You frequently see this along the edge of paintings where the protecting gesso layer ends. This is why you should always protect the edges. Why do we have to protect the paint layer? The canvas will pull the oil from the paint, leaving only the pigment, which will eventually fall from the canvas. Whenever you see an old painting with faded or nonexistent color, it’s a good guess that the oil has ‘sunk in’ to the canvas. Finally, after isolating and protecting the canvas, we want a surface suitable for oil painting.

Traditionally, artists used animal hide glue to protect the canvas. One or two coats of rabbit skin glue are applied before the ground is added. The glue protects the canvas from the bad effects of oil.
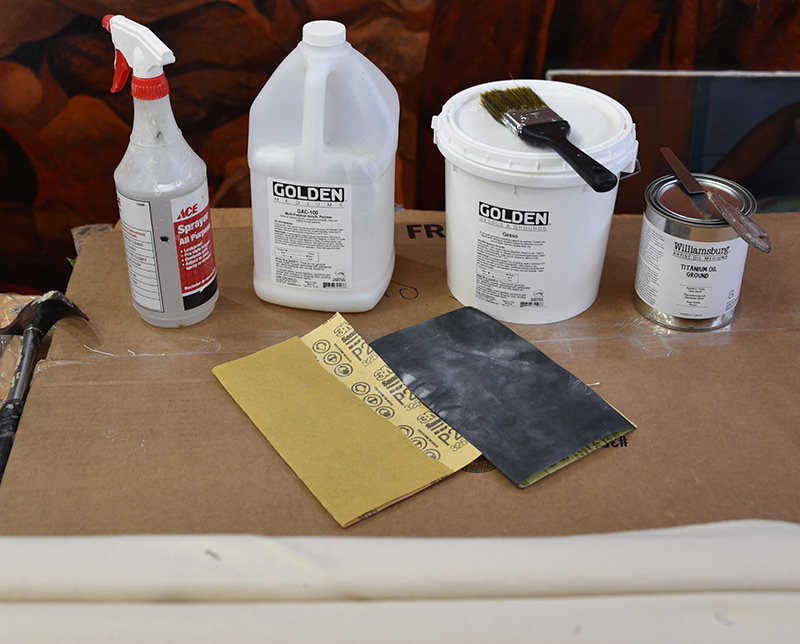
You can do the same today, although I prefer GAC 100 from Golden. Why? The GAC is consistent. In the past, I’ve had some bad experiences with hide glue. The glue as received is a powder that you add to water. After the glue absorbs the water, you paint it on the canvas with a brush. When the glue in the jar cools, it forms a gel. To reuse, you first heat it although some recipes call for the glue to be applied cold and spread with a spatula. After the glue is heated several times, it loses efficacy. And if it is stored too long, it goes bad. It’s an animal product, after all. GAC 100 has none of these issues
GAC 100 is an acrylic polymer medium that can be used with acrylic paints or used alone as a substitute for hide glue. Golden markets several versions of GAC; 100 is the version they recommend for protecting canvas. I first spray the canvas with water before applying it with a brush. Like all acrylics, it dries quickly. I wait a day before applying another coat.

It’s best to apply two coats of the protectorate. Because I prefer gallery-wrap style canvases (staples on the back, not the edges), I use acrylic gesso for the second coat. The white gesso provides a nice white band on the canvas edges that the clear GAC does not provide. I lightly sand the first coat with fine sandpaper, say grit 400, before applying the second coat. I use Golden’s acrylic gesso these days.
After a day of seasoning, I sand the gesso with coarse sandpaper, say 220, then sand a second time with fine sandpaper. Some artists paint directly on acrylic gesso, but the surface is dead for oils, and, unless you sand the heck out of it, is too rough.
Anyway, I use the acrylic gesso as a protectorate–not to paint on. When I prepare traditional canvases, staples on the edges, I use two coats for GAC and don’t use acrylic gesso at all. By the way, you do not need GAC or hide glue to protect the canvas from acrylic gesso. The gesso itself can protect the canvas, so you could use two coats of acrylic gesso before applying the ground.
Now, with our two coats of glue\GAC\acrylic gesso, it’s time to prepare the actual painting surface. For this, we use an oil ground or oil gesso. Traditional gesso is chalk and glue–yes, our same hide glue mentioned earlier. The old tempera painters and the first oil painters applied several, sometimes as many as 10, thin layers of gesso before starting to paint. Each layer was scrapped to absolute smoothness before the next layer was applied. Once all layers were applied and scrapped, painters would paint directly on the gesso. As I mentioned above, you can do that too if you want to use acrylic gesso.
While traditional gesso is perfect for wood panels, it is too brittle for canvas, unfortunately. So the early oil painters developed an oil ground or oil-based gesso. Oil ground is oil paint with the addition of the same chalk used in traditional gesso. The chalk makes the paint thicker than normal paint so it is usually applied with a scrapper, or painted on and then smoothed with a scrapper.
You can make your own oil ground by adding chalk to some white oil paint. I’ve done it several times but lately, I’m using the oil ground from Williamsburg. Solidly decent stuff. Spreading the oil ground is easy enough but it takes more time then simply painting it on, obviously.
Oil ground, like its traditional cousin, is more absorbant then normal paint. Many artists prefer this. I add a little drier and varnish to the ground before applying it. It speeds up drying time and firms the ground. I’ve also mixed other paints into the ground before applying it to produce a nice middle tone. These days, however, I prefer white grounds.
After letting the ground dry for several days, I lightly sand it with fine sandpaper (400). At this point, depending on the size of the painting, the surface is ready. On smaller paintings, I apply a second layer of oil ground.
Leave a Reply